


Rocky Linux 9.1, released in November 2022, brings notable changes such as updated module stream versions, new compiler toolset versions, the introduction of Keylime for enhanced security, and expanded support for Vagrant and container images. This comprehensive three-part guide covers installing Oracle VM VirtualBox, creating a virtual machine, and installing Rocky Linux 9. Follow the step-by-step instructions to configure settings, select software, and complete the installation process. Start your journey with Rocky Linux today!
1. Install Oracle VM VirtualBox on Windows
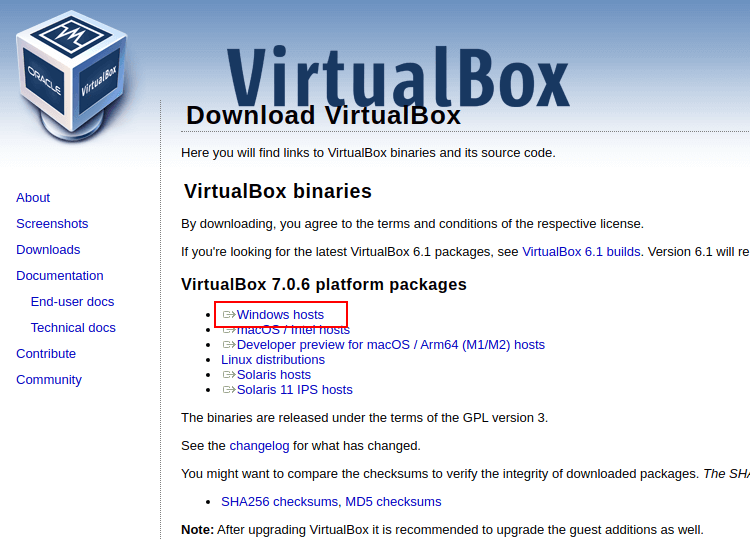
The first step is to install Oracle VM VirtualBox on which you will install your instance of Rocky Linux 9. Therefore, head over to the Oracle VM VirtualBox download page and select ‘Windows Hosts’ to download the executable file.

The download will commence and the installation file will be saved in the ‘Downloads‘ folder. To begin the installation, double-click the VirtualBox installation file.

When the User Account Control (UAC) pop-up appears during the VirtualBox installation process, you will need to confirm your permission to proceed.

Once you have confirmed your permission to proceed, the Oracle VirtualBox installation wizard will launch. The installation process is straightforward, and you can simply click ‘Next’ or ‘Yes’ at each step until you reach the final step, where you will click ‘Install’.
The first step of the installation process is the ‘Welcome’ step, where you are greeted with a brief introduction. To proceed, click the ‘Next’ button.

Proceeding to the ‘Custom Setup’ step, you will be presented with options for customizing the installation settings. By default, the Oracle VirtualBox files are stored in the C:\Program Files\Oracle\VirtualBox path. It is generally recommended to keep the default path unless you have a specific reason to change it.
To continue with the installation using the default settings, simply click ‘Next’.

A warning message will appear informing you that network connections will be reset and a new virtual network interface will be created. To proceed with the installation, click ‘Yes’.

You may receive a warning indicating that certain dependencies, such as Python Core and Win32api, are missing. In this case, they were not installed. However, don’t worry as these dependencies can be installed manually at a later stage. Click ‘Yes’ to continue with the installation.

Click ‘Install’ to initiate the custom installation of Oracle VM VirtualBox.
Wait for a minute or two for the installation to complete. Once finished, click ‘Finish’ to exit the wizard and complete the installation process.

The Oracle VirtualBox GUI manager will now be displayed, providing you with a user-friendly interface to manage your virtual machines. In the next section, we will proceed to create a new virtual machine specifically for Rocky Linux 9.

2. Creating a Virtual Machine for Rocky Linux 9
To create a virtual machine, click the ‘New‘ button shown below.

This will launch the virtual machine creation wizard. In this step, you will need to provide the necessary details for your virtual machine, such as the name of the virtual machine, the default folder where it will be stored, and the path to the Rocky Linux ISO image.
Once you have entered the required information, click ‘Next’ to proceed.

In this step, you can specify the amount of memory (RAM) and the number of CPU cores you want to allocate to the virtual machine.
Use the sliders or input fields to set the desired values for memory and CPU cores. Adjust these settings based on the resources available on your host machine and the requirements of your Rocky Linux installation.
Once you have set the desired values, click ‘Next’ to continue.

In the next step, you can specify the size of the virtual hard disk for your Rocky Linux virtual machine. Use the slider to adjust the size according to your needs. You can drag the slider back and forth to increase or decrease the size.
Once you are satisfied with your selection, click ‘Next’ to proceed.

Finally, take a moment to review all the selections you have made for your Rocky Linux virtual machine. If everything looks good and you are satisfied with the configuration, click ‘Finish’ to exit the installation wizard and proceed with the creation of the virtual machine.
However, if you need to make any changes or adjustments, you can click ‘Back’ to go back to the previous steps and modify the settings as necessary.

Once the virtual machine is successfully created, you will see it listed in the right pane of the Oracle VirtualBox GUI manager. It will be displayed with the name and details you provided during the creation process.

3. Installing Rocky Linux 9 on VirtualBox
To begin the installation process, you can either click the ‘Start’ button on the menu bar of the Oracle VirtualBox GUI manager or double-click the icon of the Rocky Linux virtual machine in the left pane. This will start the virtual machine, and you will see a black screen with a list of menu options.
From the menu, select the first option labelled ‘Install Rocky Linux 9.1’ by navigating to it using the arrow keys on your keyboard and then pressing the ENTER key to confirm your selection.

During the boot process, you will witness a series of boot messages displayed on the screen. These messages provide information about the system’s initialization and configuration. It is normal to see a flurry of text scrolling by as the system powers on. This is an indication that the operating system is loading and preparing for the installation process.

Once the installer is initialized, the Rocky Linux 9 installation interface will appear. The welcome page will prompt you to choose the installation language. Select your preferred language from the options provided and click on the ‘Continue’ button to proceed with the installation process.

The ‘Installation Summary’ window will appear, presenting various components that need to be configured before the installation begins. These components are divided into the following sections:
Localization: In this section, you can configure the language, date and time settings, keyboard layout, and localization options according to your preferences.
Software: Here, you can select the software packages and additional add-ons that you want to install during the installation process. You can choose from predefined software bundles or manually select individual packages.
System: This section allows you to set the installation destination, configure disk partitioning, and manage storage options for the Rocky Linux system.
User Settings: In this section, you can create a user account, set a root password, and configure additional user-related settings.
You can navigate through each section and configure the desired settings. Once you have reviewed and adjusted all the necessary components, you can proceed with the installation process.

We will start off with the ‘Localizaton‘ section which comprises three key sub-sections: Keyboard, Language Support, and Time & Date.

Configure Keyboard
To configure the keyboard settings, click on the ‘Keyboard’ option in the ‘Localization’ section. By default, it is set to English (US). To verify this setting, you can type some text in the provided text field.
If the default keyboard layout is correct, click ‘Done’ to proceed. However, if you want to add a new keyboard layout, you can click the plus sign [ + ] at the bottom left of the window. This will allow you to add your preferred keyboard layout from the available options. Once you have added the desired layout, click ‘Done’ to save the changes.
Ensure that the keyboard layout is correctly set according to your preference before proceeding to the next configuration step.

Configure Langauge
To configure the language support, click on the ‘Language Support’ option in the ‘Localization’ section. This will open the language selection window. From the list of available languages, select your preferred language by clicking on it.
Once you have selected your preferred language, click ‘Done’ to save the changes. The system will then apply the language settings for the installation process.
Make sure to choose the language that you are most comfortable with, as it will be used throughout the installation and in the operating system once it is installed.

Configure Time and Date
To set the correct time and date settings, click on the ‘Time & Date’ option in the ‘Localization’ section. This will open the time and date settings window.
On the map provided, locate your geographical region by clicking on it. This will set the time zone automatically based on your selection. If needed, you can fine-tune the time zone by selecting a specific city or region from the drop-down list.
Once you have set the time zone, verify that the date and time displayed are correct. If necessary, you can manually adjust the date and time using the provided controls.
After ensuring that the time and date settings are accurate, click ‘Done’ to save the changes.
Setting the correct time and date is important for proper system functioning and synchronization with external services.

Next, up, we have the ‘SOFTWARE‘ section that contains the ‘Installation Source‘ and ‘Software Selection‘ sub-sections.

Configure Installation Source
To configure the installation source, click on the ‘Installation Source’ option in the ‘Software’ section. By default, the installation media is automatically detected, and the AppStream repository is set as the default repository for software packages.
If you have the installation media inserted or mounted, it should be detected automatically. You can verify the selected installation source by checking the details displayed on the screen.
If everything looks correct and you want to proceed with the default settings, simply click ‘Done’ to continue.
The AppStream repository provides a wide range of software packages that you can install and manage on your Rocky Linux system.

Software Selection
In the ‘Software Selection’ sub-section, you have the option to choose the base environment and additional software packages for your Rocky Linux installation. Different base environments provide different sets of software and features tailored to specific use cases.
To make your selections, click on the ‘Software Selection’ option and choose the desired base environment. In this case, you have chosen the ‘Server with GUI’ base environment. Additionally, you can select any additional packages or software that you want to include in your installation.
Once you have made your selections, click ‘Done’ to proceed with the chosen base environment and software packages for your Rocky Linux installation.

The ‘SYSTEM‘ section is another yet crucial section. Here, you will partition your hard drive and also configure networking.

Installation Destination
Next up, click ‘Installation Destination‘. By default, automatic partitioning is the partitioning format. You can choose to go with this as it makes work easier.
The installer intelligently partitions the hard drive and assigns the filesystem and partition size. This is recommended partitioning format for novices or beginners at Linux who are not familiar with manual partitioning.
In this guide, we will take a different approach and demonstrate how you can manually configure the disk partitions. To get around this, under the Storage Configuration section, switch from ‘Automatic’ to ‘Custom’ and click ‘Done’

This takes you to the ‘Manual Partitioning’ section as shown. We are going to partition the hard drive as follows.
/ (root partition) - 25GB
/boot - 1GB
/home - 20GB
Swap  - 4GB
To get started with creating the partitions, click the plus sign [ + ] as shown.

On the pop-up that appears, enter the desired mount point name in the ‘Mount Point’ field and specify the desired memory size in the ‘Size’ field. After that, click ‘Add mount point’ to add the new mount point to the partition configuration.

You will now see that the boot partition has been successfully created and is listed in the left panel of the disk configuration window.

Repeat the same drill for the root ( / ) partition.

For /home partition.

To create the swap partition

After creating the necessary partitions, your partition table should resemble the one shown above. Ensure that you have similar partitions indicating the ones you have created.
To save the changes and proceed with the installation, click ‘Done’.

A table summarizing all the changes that will be applied to the partitions will be displayed, showcasing the modifications you made. To confirm and save these changes on the hard drive, click ‘Accept Changes’.

Network and Hostname
To configure the network and hostname, first, enable the network connection by toggling it on. This will allow the system to automatically acquire an IP address from the router or DHCP server.
Next, you can specify your preferred hostname in the designated field. Once you’ve entered the hostname, click ‘Apply’ to save the changes. Finally, click ‘Apply’ again to confirm the network and hostname settings.

If you wish to set a static IP, click ‘Configure’ and navigate to ‘IPv4’ settings, and then click ‘Add’.

Fill out the IP address, netmask, and gateway addresses. Be sure to also specify the DNS servers and click ‘Save’.

User Settings
Finally, we have the ‘USER SETTINGS’ section that requires you to specify the root account password and create a regular login user account.

Specify the root password and confirm it in the provided fields. Optionally, you can choose to enable SSH root login with a password, depending on your preference.
Once you have entered the required information, click ‘Done’ to finalize the user settings.

In this ‘User Creation‘ section specify the regular user details such as full name and username and specify the password.
Then click ‘Done’.

All the crucial components have been successfully configured. You can leave the ‘KDUMP’ and ‘Security Profile’ settings in their default state as they won’t affect the installation process.
Begin Rocky Linux Installation
To begin the installation process, click ‘Begin Installation’.

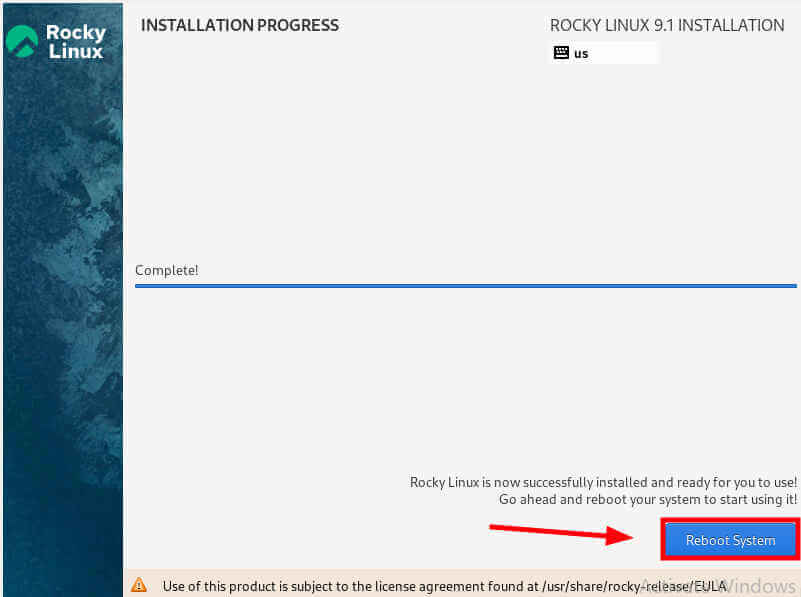
The installer will begin copying the files from the ISO image to the hard disk. This process may take some time, depending on your system specifications. It is a good opportunity to take a break and allow the installer to complete its tasks.

Once the installation is complete, click ‘Reboot’ system in order to boot into your fresh installation of Rocky Linux 9.1.

Booting into Rocky Linux 9.1
Once the system finishes booting, you will be presented with a login screen that displays the username of the newly created user.

To log in, click on the user account icon, enter the user’s password, and press ENTER.

After logging in, a “Welcome to Rocky Linux” pop-up will appear, offering to take you on a system tour to help you get acquainted. You can choose to take the tour by selecting “Yes” or cancel it by choosing “No Thanks.” The choice is entirely yours.

Finally, you will see the GNOME 40 desktop environment. From here, you can start using your fresh Rocky Linux 9.1 installation.!

Conclusion
In this guide, we provided step-by-step instructions on installing Oracle VM VirtualBox on Windows 11 and creating a virtual machine. We then proceeded to guide you through the installation process of Rocky Linux 9.1 on Oracle VirtualBox. We hope you found this guide helpful, and we welcome your feedback. If you have any questions or suggestions, please feel free to reach out.


No Comments
Leave a comment Cancel